81. Bench Hook
Description
This section is from the book "Elements Of Construction", by Charles A. King. Also available from Amazon: Elements of construction.
81. Bench Hook
Bench Hook. Fig. 155. (See Handbook: Fig. 14.)
A. Stock list:
1 cutting board, 12" X 6" X 7/8". 1 hook, 2 1/2" X 6" X 7/8" 1 rest. 21/2" X 4" X 7/8".
B. Length and width of wood: In the above dimensions, which are given in the order of length, width, and thickness, it will be noticed that the last two items are wider than they are long. It is the invariable custom that the length of a board shall be parallel with the grain, and the width at right angles to it. This model is useful upon the work bench for the purpose of holding work while it is being cut (see Figs. 88 and 90), and of providing a place upon which all cutting should be done, as a cut should never be made directly upon the bench with any sort of cutting tool.
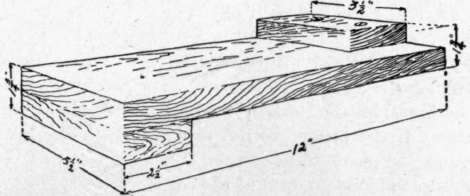
Fig. 155. - Bench Hook.
C. Sequence of work: 1. Prepare one piece \" wider and 2 1/2" longer than necessary to include all the pieces in one length.
2. Plane one edge, and block plane each end straight and square, regardless of the length of the piece.
3. Cut one piece 3" long from each end, and make one piece of the required width for the rest, or narrow piece.
4. Plane the cutting board smooth, but do not sandpaper it.
5. The vertical distance between the inside faces of the hook and the rest should, of course, be 7", which should be laid off in the middle of the length of the cutting board. Indicate the location of the hook by two knife points (not a mark) the entire width of the board. Locate the rest upon the opposite side of the board by the same method, as shown in the sketch. In placing both pieces, the squared end should form the vertical faces. Do not mark with a pencil, as the black mark will disfigure the finished model.
6. Bore screw holes in the hook and in the rest, using a German bit, and countersink the holes; by this is meant the boring of a hole which tapers from the surface of the board to the center of the hole, and which allows the screw head to be driven flush, or below the surface of the wood. Hold both pieces in their exact places, and with a hammer tap the screws lightly, but sufficiently to mark the holes in the cutting board; remove the pieces preparatory to gluing, and bore small holes in the cutting board to receive the screws.
7. Be sure that both the small pieces fit the cutting board; spread the glue sparingly upon the side of the hook which.is to form the joint, and force it into its place by screws. Do the same with the rest, and whether the joint is as good as it should be or not, apply hand screws to force the pieces of wood closely together, and hold them while the glue hardens. If the pieces are not held firmly, the moisture of the glue will cause the pieces to swell upon the sides which have received it, thus causing the joint to open at the edges.
8. After the glue has hardened, treat the pieces as one, cut to length, blockplane the ends, plane to width, and make the model square and true. If the work is planned and executed accurately, each of the three pieces will finish the size called for in the stock list.
Continue to:
My Books

