


Exercise XXII. A Shield
Description
This section is from the book "Manual Instruction: Woodwork. The English Sloyd", by S. Barter. Also available from Amazon: Manual Instruction: Woodwork.
Exercise XXII. A Shield
Fig. 272. This shield is much more difficult than the two given earlier in the course, as may he seen from the drawing, and involves the use of the gouge as well as the firmer chisel.
In doing the work pay continual attention to the drawing. On the middle of the surface make good sweeping shearing strokes, and at the corners a broad gouge should be used. No description can satisfactorily elucidate the modelling of this shield. The only advice that can be given is to proceed gradually, and work at every part successively, finishing with spokeshave, file, and glass-paper.
Edge Dovetailing. Fig. 273
The isometric projection, as in fig. 273, only need be made. It will be seen that this joint is very similar to the angle bridle joint, the difference being that the sides of the tenon are slightly inclined to each other in the joint at present under notice, and the mortice is made with inclined walls to take this dovetailed tenon.

Fig. 273.
This joint, although apparently not much more difficult than the angle bridle, is in reality much harder to make. It is very much stronger, however, as will be readily appreciated from its appearance.
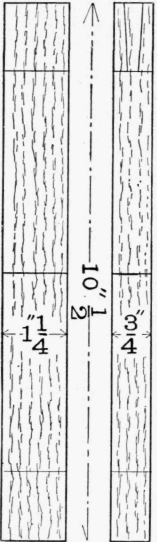
A piece of wood 11 ins. long, 1 in. thick, and 1 1/2 in. wide will be required to make the joint.
Set out as in fig. 274, making, as usual, cut lines for the depth line, all round the wood at the shoulders, and a pencil line at the end for the mortice. The rest of the setting out must be done in pencil, and this constitutes a source of difficulty at the commencement of the work.
Saw out the tenon, as in fig 275, and cut the wood in halves. The tenon should now be applied to the end of the other half of the wood, as in fig. 276. The precise size of the mortice can now be marked with a fine pencil, or a chisel, while the two pieces are in contact. In order to make the faces of the finished joint true, it is advisable in placing the tenon against the end of the mortice half to lay both pieces on the flat surface of another piece of trued-up wood.
From the ends of the two cut lines gauge parallel lines down the edges to the length of the mortice, and carefully saw and mortice out the waste, as in fig. 277.
Face side.
Face edge.
Fig. 274.
This sawing and mortising require to be carefully done to ensure a good joint. When glued up, the shape of the mortice has the effect of keeping the shoulder of the tenon well up to the side of the mortice.

Fig. 275.
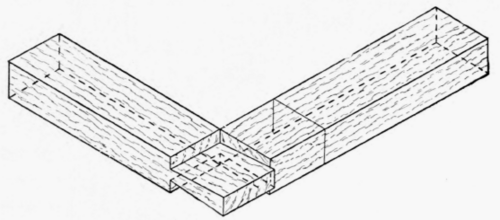
Fig. 276.
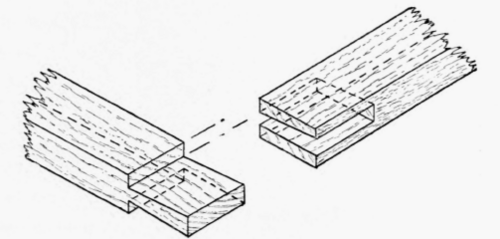
Fig. 277.
Continue to:


My Books

