51. Exercise In Chiseling
Description
This section is from the book "Elements Of Construction", by Charles A. King. Also available from Amazon: Elements of construction.
51. Exercise In Chiseling
Exercise In Chiseling. Fig. 89. Material: Poplar or pine. 1 piece, 12" x 1 1/2"x 7/8". In preparing the material for this and for the following models, the exercises from 50 A to M should be followed with each piece, although if the models are made of \" stock, Exercise L may be omitted, because that is a stock thickness, always carried by lumber dealers.
If one end is to be fitted against another piece, as in the various forms of construction. Exercise I should be omitted until after the joint is fitted. See Topic 49 A.
A. Laying out grooves: 1. Mark the grooves with a knife, try-square, and bevel; make the marks upon the face side at angles similar to those shown in Fig. 89.
2. From each of the lines above described, with a knife and try-square, make distinct marks or cuts upon the edge, a little less than one half of the thickness of the piece, measuring by the eye.
3. Gauge very lightly upon both edges, 7/16" from the face side between the knife marks (a), thus indicating the sides of the grooves which are to be cut. In using the gauge, be careful not to run over the spaces which will be cut out by the grooves, as the scratches will be a blemish upon the finished work.
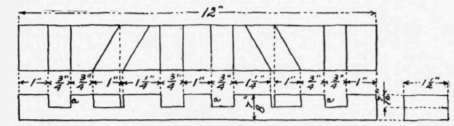
Fig. 89. - Exercise in Chiseling.
B. Cutting grooves: 1. With the backsaw, cut the grooves across the face and by lines a, as nearly to the depth gauge marks as possible, without touching them. In doing this, hold the work in the bench hook, as shown in Fig. 88.
2. Cut the grooves by using a sharp paring chisel, somewhat narrower than the width of the groove; remove the wood from between the saw cuts (a), as shown in Fig. 89, guarding carefully against cutting below the gauge marks upon the edges, or allowing the chisel to follow the grain deeper than is desired. Make light cuts; do not try to take the wood all out at once by using a mallet to force the chisel, but be sure that the chisel is perfectly sharpened, and work slowly and carefully. The best results may be obtained by using the tool as shown in Fig. 90, the beveled side up, as the left hand, holding the chisel, will be an efficient guide and check upon its slipping.

Fig. 90. - Use of the Bench Hook with the Paring Chisel.
Continue to:
My Books

