50. Straight Edge
Description
This section is from the book "Elements Of Construction", by Charles A. King. Also available from Amazon: Elements of construction.
50. Straight Edge
Straight Edge. Fig. 86. Material: 1 piece, 24" x 1 3/4" x \ " thick.
A. Lining off: Select a straight-grained, soft 1/2" board, and, holding the pencil and rule as shown in Fig. 87, line off the piece about \" wider than desired.
B. Use of the ripsaw: Saw to above line. See Topic 11 D.
C. Use of the cutting-off saw: Cut the piece off about \" longer than desired.
D. Marking the face side: Mark the figures 1, 2, 3, 4, upon the best, or face, side of the piece, as in Fig. 86, the face edge, or best edge, being marked " 1."
E. Planing edge straight: Straighten edge 1. Plane straight and square with face side. See Topics 15 and 19. Use the try-square as in Fig. 5 ; if desired, the piece may be held in the hand instead of in the vise.
F. Testing an edge: Prove that the edge is straight by sighting along it, and then use a straightedge to see whether or not the eye is true. All edges should be tested in this way until the eye is trained to know when an edge or surface is true. The use of mechanical aids to accuracy ought not to be encouraged, as the eye should be trained to perform this work without depending upon artificial means.

Fig. 86. - Straight Edge.
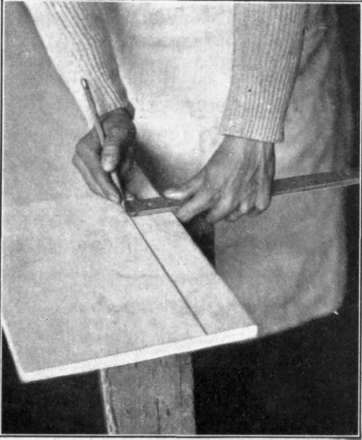
Fig. 87. - Lining off for Ripsawing.
G. Square end 2 ; cut in the bench hook, as in Fig. 88. Use the backsaw, but be careful when the saw cuts through the wood to have it come in contact with the bench hook, and not with the bench.
H. Block planing: Block plane end 2. See Topic 18, B, Fig. 34. Make the end square and true, after which it should not be touched again.
I. Cutting to exact length: Cut end 3 to neat, or exact, length. Measure from end 2, and mark with a distinct knife cut by the blade of a try-square ; do not use a pencil. With a backsaw, cut the end off carefully, leaving the knife mark upon the piece, and with a block plane, work it down to exactly the required length, in the same way that end 2 was finished.
J. Use of gauge: Gauge to width. See Topic 7, Fig. 11. Working from edge 1, make a line exactly 1 3/4' from that edge. Before doing this it will be wise to practice upon a waste piece, until the tool is well under control.
K. Planing a parallel edge: With a jack plane, plane edge 4 exactly to the gauge mark, when it should be parallel with edge 1, and square with the face side.
The foregoing is, in general, the method which should be followed in making any piece square.
L. Planing to thickness: Using the gauge as above described, make a line upon the edge of the piece entirely around it, and 1/4" from the face side. Plane to this line, and, if working against an iron bench dog, guard against bruising the end of the straightedge by placing a waste piece between it and the dog. Do not hold the piece in the vise, as a piece so thin will be sprung out of shape by the pressure.

Fig. 88. - Use of the Bench Hook and the Backsaw.
M. Working from the face side or edge: It is an almost invariable rule in carpentry to work from one side or edge, generally the best, which is known as the face side or edge, and from which everything is worked, measured, or squared. The student should never lose sight of this, and from the very beginning should acquire the habit of working from this edge. This habit becomes second nature to a good workman.
Continue to:
My Books

