88. Threefold Screen Frame
Description
This section is from the book "Elements Of Construction", by Charles A. King. Also available from Amazon: Elements of construction.
88. Threefold Screen Frame
Threefold Screen Frame.
Oak. Fig. 166.
A. Omission of stock list: The stock list for this and succeeding models will be omitted, mention being made simply of the pieces necessary, the student estimating their dimensions.
Sequence of work: Get out all the pieces except the panels b, and the beads h, which hold the panels in place to their exact dimensions.
The stiles should be planed square upon their inside edge; that is, the edge against which the shoulders of the tenons fit. Work from the face side, and leave the stiles the full width to which the piece has been roughly cut (without planing the other edge) and an inch or more longer than desired, as this extra wood may be needed before the screens are finished.
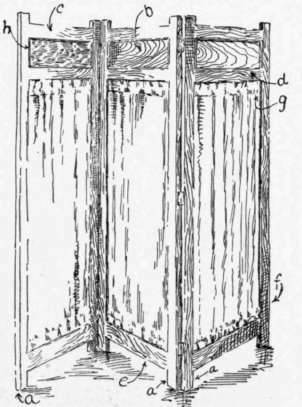
Fig. 166. - Threefold Screen.
Cut off the top rails, c, the middle rails, d, and the bottom rails, e, 2" longer than the desired distance between the stiles, because the tenons on each end will enter the mortise in the stiles, 1". Mark all the shoulders on these rails at once, allowing exactly the same distance between, that it is desired that the stiles shall be apart; mark each separately, and square carefully around all sides with a distinct knife mark, working always from the face side and edge.
B. Laying out mortises and tenons: The stiles should now be placed side by side, inside edges up, as in Fig. 167. Across the inside edges of all the stiles draw pencil lines square with the sides, as at b, indicating the exact location and length of the mortises. With a mortise gauge set to make the marks for a 1/4" mortise, mark all the mortises in the stiles, and the tenons on the ends of all the rails, without changing the set of the gauge, working from the face side in every case. This is important. With a \" bit, bore one hole in the middle of the length of each mortise, and with a \" chisel, cut out the mortise, cutting across the grain in every case, never parallel with it; be careful that neither the 1/4" hole nor the mortise goes through to the other edge of the stile.
C. Drapery rods: Bore a 3/8" hole, 1" deep, 1" to its center above the bottom rail, as at /, and the same distance below the middle rail, as at g, to receive the dowels or brass rods which support the drapery panels. Smooth and sandpaper the edges of the rails and stiles, except the outsides of the latter, but not the sides of any of the pieces.
D. Gluing: Glue the frames together, holding them in place by clamps, as in Fig. 168, which are used for the same purpose as handscrews upon work which is too large for the latter to reach. These should be placed exactly opposite each rail, so as to hold the frame square. If the frame is not perfectly square, move one clamp to a slight angle, as at ab; this angle and its direction must be such that the pressure applied by the clamp will pull the frame square and hold it so until the glue sets.

Fig. 167. - Threefold Screen - Marking for Mortises.
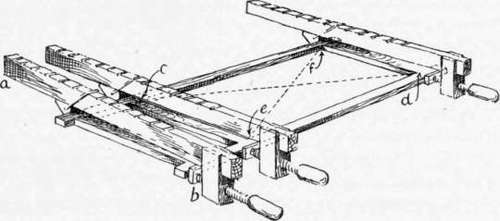
Fig. 168. - Threefold Screen - Gluing and Squaring by Diagonals.
E. Squaring the frames: Do not use a square to test the frame, because the clamp may spring the stile out of a perfectly straight line, in which case a square would be useless. Use a stick of suitable length, sharpened to a chisel point, to measure the diagonals c d, and e f. Place the point of the stick in the angle at d, and make a pencil mark at c; change the stick to ef and compare cd and ef. By swinging the clamp as described above, make the diagonals the same length, if the first measurements do not coincide.
After the glue has set, joint the edges of the stiles square and to the desired width. Smooth and scrape both sides of the frame. If strap hinges, as shown in Fig. 170, are to be used, round the edges as shown at e, Fig. 169, and sandpaper thoroughly.
F. Beads and panels: Prepare, miter, and fasten in place upon one side of the frame the small beads shown at /, Fig. 169. These should be made flush with one face of the frame, leaving those of the other side loose. They may be made with a bead plane, which makes a molding shaped like those indicated, or the pieces may be rounded by hand, though any small molding may be used which does not project beyond the face of the frame, in which case the screen cannot be folded together. Cut the panels, g, to the correct size; smooth, scrape, and sandpaper them; then remove the loose beads, put the panels in place, and fasten the other beads, which will hold the panel securely. G. Finish and hinges: Stain, fill, and finish the screen to suit taste. Prepare twelve strips of thin sheet brass or rawhide, say 3" X 1", for hinges, and put them on as shown in Fig. 170, using brass tacks with a very flat round head, so that they will not mar the face of the screen which is folded against them. This makes a satisfactory screen hinge, as it allows the screen to be opened either way; two of the strips make one hinge, and three hinges are necessary for each joint. An ordinary hinge may be used, in which case the stiles should be left square.
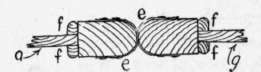
Fig. 169. - Threefold Screen - Section of Stiles for Fly Hinge.

Fig. 170. - Threefold Screen - the Fly Hinge.
Hinges of this sort will allow the screen to swing but one way.
H. Drapery panel: Six 3/8" dowels, or brass curtain rods, should be made the right length to enter the holes which were bored to receive them; these are to hold the drapery which forms the large panel of the screens. The drapery should then be adjusted on the rods and the latter sprung into position.
Continue to:
My Books

